
# Details of Residential Plant
Details of a residential plant are presented in the form of menu. It includes three parts: Plant, Devices, and Messages.
# Plant
Plant is composed of Overview, Intelligent (TOU), Plant management, and Live data, which are introduced below one by one.
# Overview
The following takes a plant as an example to describe the composition and functions of the overview page.

| SN | Description |
|---|---|
| a | This area displays the name and running status of plant. Running status includes:
|
| b | Displays the statistics of the plant, including PV power, installed capacity, daily and total power yield, daily and total power consumed, daily and monthly self use rate, power exported to grid today and monthly. Click  beside each field to check its definition. beside each field to check its definition.
|
| c |
|
| d | Displays the situations of battery, including battery SOC, battery status, charged/discharge today, battery remaining, and estimated remaining hours. |
| e |
|
| f | Displays the earnings of the plant in the dimension of All, Year, Month, and Day. The indicators are Export earnings, Savings, and Earnings, which selectively shown in the horizontal axis. Earnings = Savings + Export earnings. |
| g | Displays the contributions made by means of PV power generation to the environment. The measurement indicators are CO2 avoided, equivalent trees planted, and standard coal saved. |
[!Note]
- In the time dimension, "All" refers to the time since the plant has been created.
- Only when the tariff is set can the system calculate the earnings of the plant.
- Only when a battery is connected to the plant can storage analysis start to work.
# Intelligent (TOU)
TOU mode is not available to all users. Only when there is a device supporting the function in the plant, can the function is available. The method for creating TOU is shown below:
Enter the TOU name.
Select the method for setting periods.
- If selecting Import period, you can directly invoke the already created TOU tariff. For details about setting the TOU tariff, see Tariff Setting. The non-TOU tariff (herein refer to fixed tariff and custom auto tariff) is not supported.
- If selecting Customize, you need to divide into different time periods by yourself.
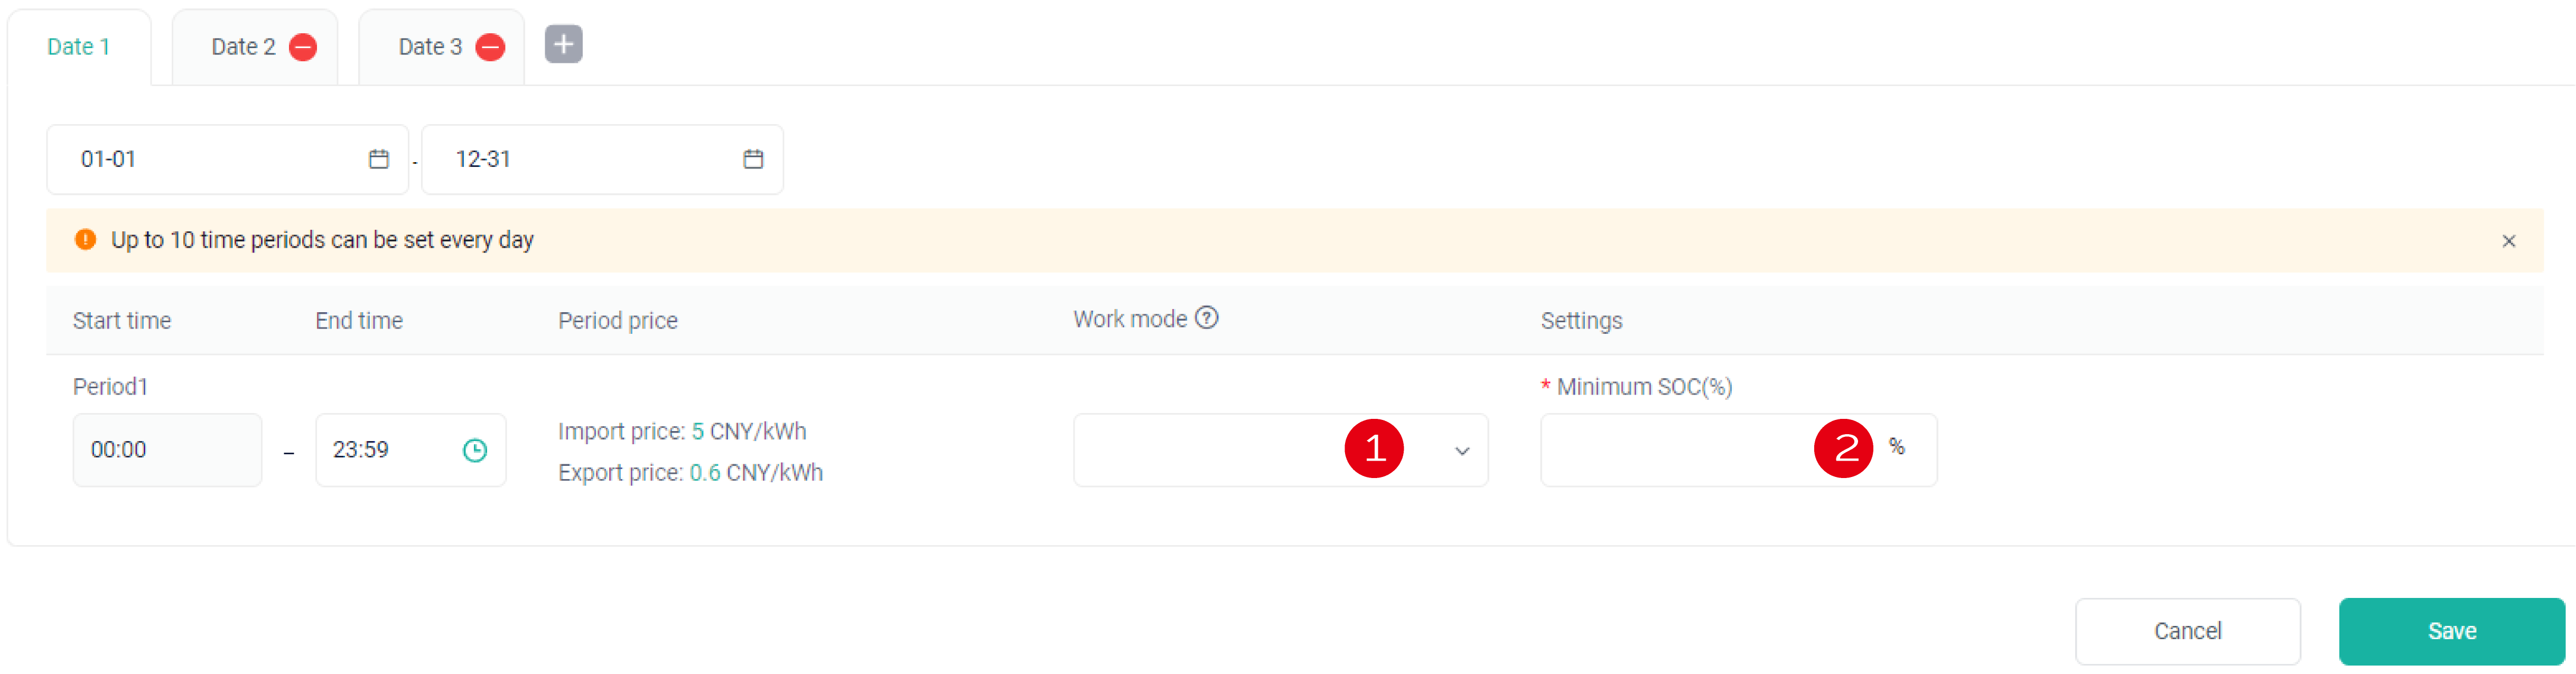
Set the cycle type (if you select Customize) and the minimum SOC.
Divide one year into different time periods and set work modes for daily cycle for each time period. One day can be divided into 10 time slots and support 5 work modes at most. According to the method for setting periods, the following shows detailed steps:
Import period
Because you have complete period division and price setting during tariff setting, you only need to execute the following steps:
- According to the export/import price, set a work mode for each time slot of each time period.
- Set parameters for each work mode. The setting items may vary with work modes. The setting items in this image only work as an example.
Customize
- Click the blank of end date, to divide one year into different time periods.
- Click the blank of end time, to divide one day into different time slots. One day (24h) can be divided into 10 time slots. Two neighboring time slots cannot be overlapped and intermittent.
- Set work modes for each time periods.
- Set parameters for each work mode. The setting items may vary with different work modes. The setting items in this image only work as an example.

Click Save, to apply this mode to devices supporting the TOU function.
# Plant management
For convenience of plant management, these operations are available to you:
Edit: You can edit or modify the basic information of plant.
Tariff: You can set the tariff for users according to their situations. For the setting method, see Tariff setting。
Add device: For details, see Device>Add device below.
Set as default: You can help a home user to set the current plant as default plant, and then he/she will see data of the plant on the homepage after login.
Statistical range: Set whether inverter and meter are included in the statistical range.
Delete: Delete the current plant, which needs to be authenticated by means of authentication code sent to the email or phone of a home user.
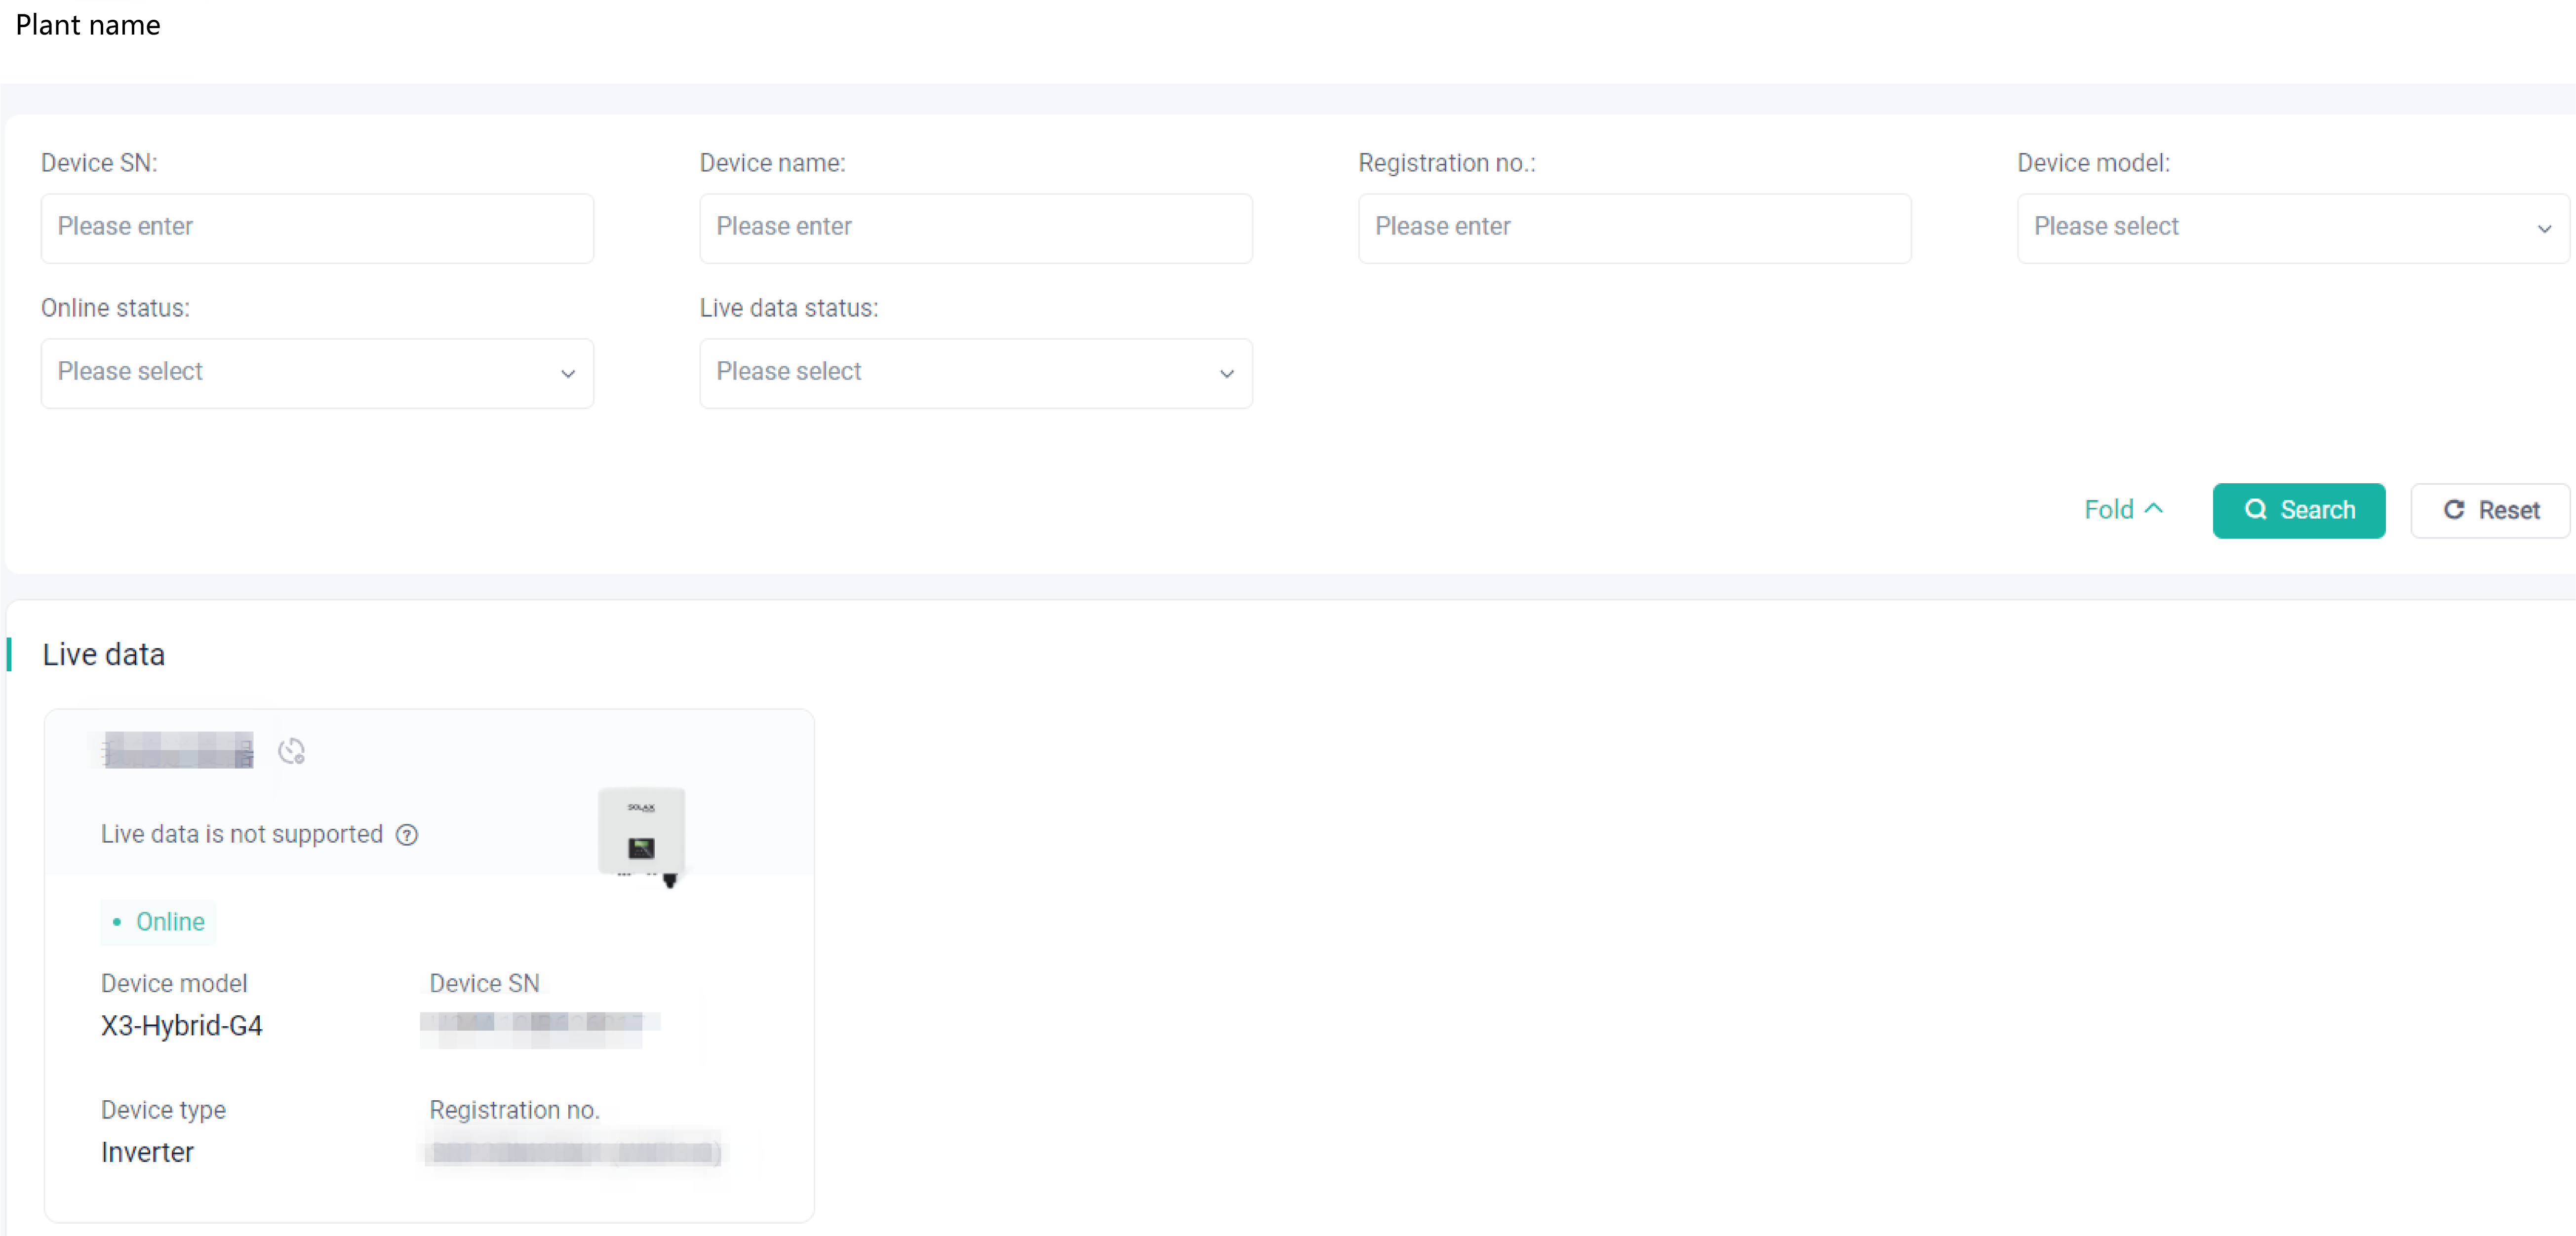
# Live data
It supports a device to refresh data every 10s. By setting the search conditions, you can know whether a device supports the live data function.
For devices that do not support the live data, it may be caused by the following reasons:
Pocket type supported, but firmware version not supported: Upgrade firmware for your users.
Pocket type not supported: Recommend the proper dongle types to users.
Micro inverter and Datahub do not support the function.
[!Note] When you have switched away from the dynamic energy flow diagram or closed the live data function for 15 minutes, the device data will stop reporting.
# Device
The Device page displays all devices in the plant. You can search for one or more devices by device SN, device name, registration number, device type,and online status.
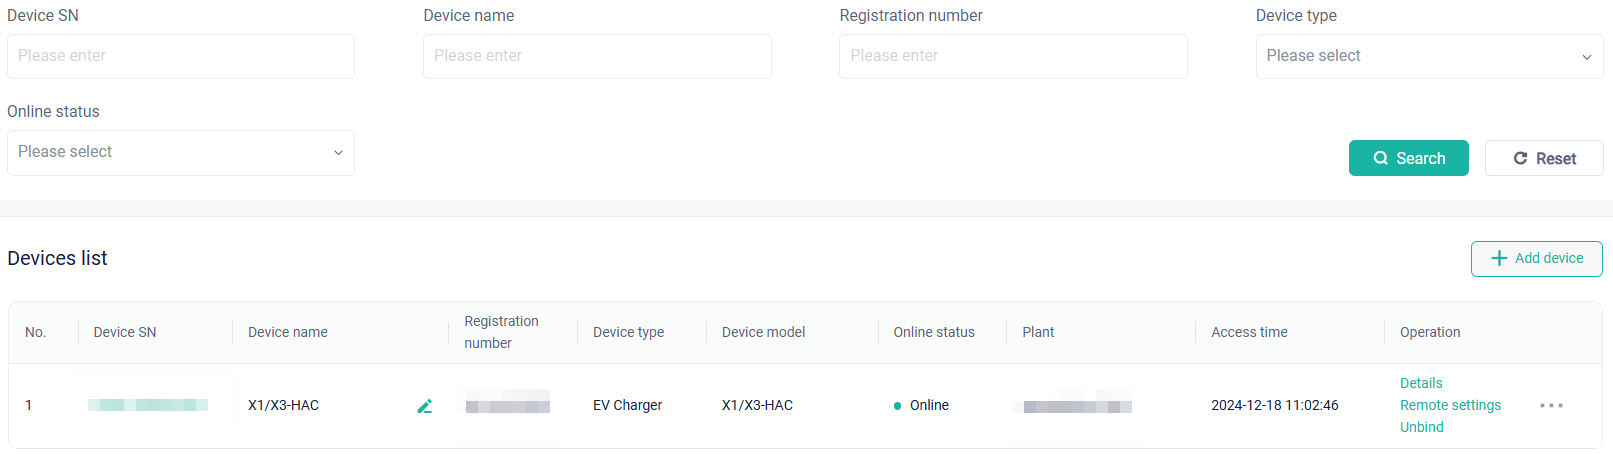
The following operations are available to you:
Edit: Click
 to edit the device name.
Details: Click Details in the Operation column, to view the detailed information about the device. The detail pages vary with the device type, which shall be subject to the actual situations.
Unbind: Click Unbind in the Operation column, unbind the device from the plant. Note that some inverters need to be unbound via the Pocket Dongle.
Remote settings: Click Remote Settings in the Operation column, to set parameters for a device remotely through the webpage. Currently, devices supporting remote settings include inverter, EV charger, Datahub and so on. The parameter setting item varies with the device type. For the setting method, see the corresponding user manual of a device. The website for user manuals: https://www.solaxpower.com/products/.
User settings: The initial password is "0000".
Advanced settings: The initial password is "2014".
Backup password:It is used for local access. If a user ever set a local password but forgot it, an installer or distributor can use it for login. Only applicable to devices supporting this function.
Ripple Control: Only applicable to devices supporting this function.
IV curve:Only applicable to devices supporting this function. You can master the device real-time running status by monitoring the voltage and current of PVs via the IV curve, so as to identify, locate, and solve problems quickly.
Add device: Add a device to the plant. Steps: 1. No need to select. The current plant is the one to which a device is added. 2. Manually add or import devices through Excel.
# Messages
This page displays all warning messages, including current messages and historical messages. You can search for messages by alarm level, device type, or report time. Through the data in messages, for example device type, alarm name, or error code, to identify, locate, and solve the problem.